本文共 34102 字,大约阅读时间需要 113 分钟。
前言
最近一直在处理公司项目本地数据库,原来的订单数据都是采用SP加密保存的,但SP仅仅适合数据量小的数据存储,随着功能的扩展发现数据越来越多越来越杂,所以这部分数据全部迁移到本地数据库还是有必要的,之前项目已经采用了Greendao,这块本来也想做个总结,但是greendao知识点比较丰富,后来上网发现别人总结的一篇很全面——,这里就做一个转载记录,方便工作过程中查阅调优。另外特别说明一下Greendao官方已经不再维护了,替代方案也有很多,例如ObjectBox(与Greendao同一公司)、Realm、Room(Google官方)等。本篇也有额外说明,如果想更好的使用Greendao,请结合另外一篇查看,会起到事半功倍的效果。
要点
本文主要从如下几个方面进行讲解:
- 存储的数据库结构
- GreenDao的优缺点
- GreenDao的使用配置
- 使用GreenDao实现数据的增删改查
- GreenDao的注解使用
- GreenDao的关系处理
- GreenDao的升级
- GreenDao数据库加密
- 项目地址
- 总结
- 参考博客
存储的数据库结构
学习数据库之前,我们先得设计自己的数据库,不多废话,下面是我此次学习的数据库结构,后面所有的数据请参考这个图进行学习:

GreenDao的介绍
简单的GreenDao的介绍,嫌麻烦的可以直接跳到GreenDao使用开始看。
什么是GreenDao?
GreenDAO是一个开源的Android ORM(“对象/关系映射”),通过ORM(称为“对象/关系映射”),在我们数据库开发过程中节省了开发时间!

GreenDao的官方文档
GreenDao的作用
通过GreenDao,我们可以更快速的操作数据库,我们可以使用简单的面相对象的API来存储,更新,删除和查询Java对象。
GreenDao的优缺点
- 高性能,下面是官方给出的关于GreenDao,OrmLite和ActiveAndroid三种ORM解决方案的数据统计图:

- 易于使用的强大API,涵盖关系和连接;
- 最小的内存消耗;
- 小库大小(<100KB)以保持较低的构建时间并避免65k方法限制;
- 数据库加密:greenDAO支持SQLCipher,以确保用户的数据安全;
GreenDao的使用
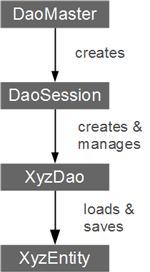
GreenDao的核心类有三个:分别是DaoMaster,DaoSession,XXXDao,这三个类都会自动创建,无需自己编写创建!
- DaoMaster::DaoMaster保存数据库对象(SQLiteDatabase)并管理特定模式的DAO类(而不是对象)。它有静态方法来创建表或删除它们。它的内部类OpenHelper和DevOpenHelper是SQLiteOpenHelper实现,它们在SQLite数据库中创建模式。
- DaoSession:管理特定模式的所有可用DAO对象,您可以使用其中一个getter方法获取该对象。DaoSession还提供了一些通用的持久性方法,如实体的插入,加载,更新,刷新和删除。
- XXXDao:数据访问对象(DAO)持久存在并查询实体。对于每个实体,greenDAO生成DAO。它具有比DaoSession更多的持久性方法,例如:count,loadAll和insertInTx。
- Entities :可持久化对象。通常, 实体对象代表一个数据库行使用标准 Java 属性(如一个POJO 或 JavaBean )。
导入Gradle插件和Dao代码生成
要在Android项目中使用GreenDao,您需要添加GreenDao Gradle插件并添加GreenDao库:
导入插件
// 在 Project的build.gradle 文件中添加:buildscript { repositories { jcenter() mavenCentral() // add repository } dependencies { classpath 'com.android.tools.build:gradle:3.1.2' classpath 'org.greenrobot:greendao-gradle-plugin:3.2.2' // add plugin }} 配置相关依赖
// 在 Moudle:app的 build.gradle 文件中添加:apply plugin: 'com.android.application'apply plugin: 'org.greenrobot.greendao' // apply plugin dependencies { implementation 'org.greenrobot:greendao:3.2.2' // add library} 配置数据库相关信息
greendao { schemaVersion 1 //数据库版本号 daoPackage 'com.aserbao.aserbaosandroid.functions.database.greenDao.db'// 设置DaoMaster、DaoSession、Dao 包名 targetGenDir 'src.main.java'//设置DaoMaster、DaoSession、Dao目录,请注意,这里路径用.不要用/ generateTests false //设置为true以自动生成单元测试。 targetGenDirTests 'src/main/java' //应存储生成的单元测试的基本目录。默认为 src / androidTest / java。} 配置完成,在Android Studio中使用Build> Make Project,重新build项目,GreenDao集成完成!
创建存储对象实体类
使用GreenDao存储数据只需要在存储数据类前面声明@Entity注解就让GreenDao为其生成必要的代码:
@Entitypublic class Student { @Id(autoincrement = true) Long id; @Unique int studentNo;//学号 int age; //年龄 String telPhone;//手机号 String sex; //性别 String name;//姓名 String address;//家庭住址 String schoolName;//学校名字 String grade;//几年级 ……getter and setter and constructor method…… } GreenDao初始化
我们可以在Application中维持一个全局的会话。我们在Applicaiton进行数据库的初始化操作:
/** * 初始化GreenDao,直接在Application中进行初始化操作 */ private void initGreenDao() { DaoMaster.DevOpenHelper helper = new DaoMaster.DevOpenHelper(this, "aserbao.db"); SQLiteDatabase db = helper.getWritableDatabase(); DaoMaster daoMaster = new DaoMaster(db); daoSession = daoMaster.newSession(); } private DaoSession daoSession; public DaoSession getDaoSession() { return daoSession; } 初始化完成之后重新rebuild一下项目会发现在设置的targetGenDir的目录生成三个类文件,这个是GreenDao自动生成的!说明数据库已经连接好了,咱们接下来只需要进行数据库的增删改查操作就行了。Let’s Go!
使用GreenDao实现增删改查
增
insert() 插入数据
@Override public void insertData(Thing s) { DaoSession daoSession = ((AserbaoApplication) getApplication()).getDaoSession(); for (int i = 0; i < 1000; i++) { Student student = new Student(); student.setStudentNo(i); int age = mRandom.nextInt(10) + 10; student.setAge(age); student.setTelPhone(RandomValue.getTel()); String chineseName = RandomValue.getChineseName(); student.setName(chineseName); if (i % 2 == 0) { student.setSex("男"); } else { student.setSex("女"); } student.setAddress(RandomValue.getRoad()); student.setGrade(String.valueOf(age % 10) + "年纪"); student.setSchoolName(RandomValue.getSchoolName()); daoSession.insert(student); } } insertOrReplace()数据存在则替换,数据不存在则插入
@Override public void insertData(Thing s) { DaoSession daoSession = ((AserbaoApplication) getApplication()).getDaoSession(); for (int i = 0; i < 1000; i++) { Student student = new Student(); student.setStudentNo(i); int age = mRandom.nextInt(10) + 10; student.setAge(age); student.setTelPhone(RandomValue.getTel()); String chineseName = RandomValue.getChineseName(); student.setName(chineseName); if (i % 2 == 0) { student.setSex("男"); } else { student.setSex("女"); } student.setAddress(RandomValue.getRoad()); student.setGrade(String.valueOf(age % 10) + "年纪"); student.setSchoolName(RandomValue.getSchoolName()); daoSession.insertOrReplace(student);//插入或替换 } } 删
删除有两种方式:delete()和deleteAll();分别表示删除单个和删除所有。
@Override public void deleteData(Student s) { DaoSession daoSession = ((AserbaoApplication) getApplication()).getDaoSession(); daoSession.delete(s); } @Override public void deleteAll() { DaoSession daoSession = ((AserbaoApplication) getApplication()).getDaoSession(); daoSession.deleteAll(Student.class); } 改
通过update来进行修改:
@Override public void updataData(Student s) { DaoSession daoSession = ((AserbaoApplication) getApplication()).getDaoSession(); daoSession.update(s); } 查
查询的方法有:
- loadAll():查询所有数据。
- queryRaw():根据条件查询。
- queryBuilder() : 方便查询的创建,后面详细讲解。
public List queryAll(){ List students = daoSession.loadAll(Student.class); return students; } @Override public void queryData(String s) { List students = daoSession.queryRaw(Student.class, " where id = ?", s); mDataBaseAdapter.addNewStudentData(students); } QueryBuilder的使用
编写SQL可能很困难并且容易出现错误,这些错误仅在运行时才会被注意到。该QueryBuilder的类可以让你建立你的实体,而不用SQL自定义查询,并有助于在编译时已检测错误。
我们先讲下QueryBuilder的常见方法:
- where(WhereCondition cond, WhereCondition… condMore): 查询条件,参数为查询的条件!
- or(WhereCondition cond1, WhereCondition cond2, WhereCondition… condMore): 嵌套条件或者,用法同or。
- and(WhereCondition cond1, WhereCondition cond2, WhereCondition… condMore): 嵌套条件且,用法同and。
- join(Property sourceProperty, Class destinationEntityClass):多表查询,后面会讲。 输出结果有四种方式,选择其中一种最适合的即可,list()返回值是List,而其他三种返回值均实现Closeable,需要注意的不使用数据时游标的关闭操作:
- list ()所有实体都加载到内存中。结果通常是一个没有魔法的 ArrayList。最容易使用。
- listLazy ()实体按需加载到内存中。首次访问列表中的元素后,将加载并缓存该元素以供将来使用。必须关闭。
- listLazyUncached ()实体的“虚拟”列表:对列表元素的任何访问都会导致从数据库加载其数据。必须关闭。
- listIterator ()让我们通过按需加载数据(懒惰)来迭代结果。数据未缓存。必须关闭。
- orderAsc() 按某个属性升序排;
- orderDesc() 按某个属性降序排;
GreenDao中SQL语句的缩写,我们也了解下,源码在Property中,使用的时候可以自己点进去查询即可:
- eq():“equal (’=?’)” 等于;
- notEq() :“not equal (’<>?’)” 不等于;
- like():" LIKE ?" 值等于;
- between():" BETWEEN ? AND ?" 取中间范围;
- in():" IN (" in命令;
- notIn():" NOT IN (" not in 命令;
- gt():">?" 大于;
- lt():"<? " 小于;
- ge():">=?" 大于等于;
- le():"<=? " 小于等于;
- isNull():" IS NULL" 为空;
- isNotNull():" IS NOT NULL" 不为空;
使用QueryBuilder进行查询操作
简单条件查询
查询当前Student表的所有的数据:
public List queryAllList(){ DaoSession daoSession = ((AserbaoApplication) getApplication()).getDaoSession(); QueryBuilder qb = daoSession.queryBuilder(Student.class); List list = qb.list(); // 查出所有的数据 return list; } 查询Name为“一”的所有Student:
public List queryListByMessage(String name){ DaoSession daoSession = ((AserbaoApplication) getApplication()).getDaoSession(); QueryBuilder qb = daoSession.queryBuilder(Student.class); QueryBuilder studentQueryBuilder = qb.where(StudentDao.Properties.Name.eq("一")).orderAsc(StudentDao.Properties.Name); List studentList = studentQueryBuilder.list(); //查出当前对应的数据 return list; } 原始查询
通过原始的SQL查询语句进行查询!其实上面有提到QueryBuilder的目的就是方便快捷的编写SQL查询语句,避免我们自己在编写过程中出错!简单介绍下通过QueryBuilder编写数据库,方式方法如下 :
public List queryListBySqL(){ // 查询ID大于5的所有学生 DaoSession daoSession = ((AserbaoApplication) getApplication()).getDaoSession(); Query query = daoSession.queryBuilder(Student.class).where( new WhereCondition.StringCondition("_ID IN " + "(SELECT _ID FROM STUDENT WHERE _ID > 5)") ).build(); List list = query.list(); return list; } 嵌套条件查询
查询Id大于5小于10,且Name值为"一"的数据:
public List queryList(){ DaoSession daoSession = ((AserbaoApplication) getApplication()).getDaoSession(); QueryBuilder qb = daoSession.queryBuilder(Student.class); qb = daoSession.queryBuilder(Student.class); List list2 = qb.where(StudentDao.Properties.Name.eq("一"), qb.and(StudentDao.Properties.Id.gt(5), StudentDao.Properties.Id.le(50))).list(); return list2; } 取10条Id大于1的数据,且偏移2条
public List queryListByOther(){ DaoSession daoSession = ((AserbaoApplication) getApplication()).getDaoSession(); QueryBuilder qb = daoSession.queryBuilder(Student.class); //搜索条件为Id值大于1,即结果为[2,3,4,5,6,7,8,9,10,11]; // offset(2)表示往后偏移2个,结果为[4,5,6,7,8,9,10,11,12,13]; List list = qb.where(StudentDao.Properties.Id.gt(1)).limit(10).offset(2).list(); return list; } 多次执行查找
使用QueryBuilder构建查询后,可以重用 Query对象以便稍后执行查询。这比始终创建新的Query对象更有效。如果查询参数没有更改,您可以再次调用list / unique方法。可以通过setParameter方法来修改条件参数值:
public List queryListByMoreTime(){ DaoSession daoSession = ((AserbaoApplication) getApplication()).getDaoSession(); QueryBuilder qb = daoSession.queryBuilder(Student.class); //搜索条件为Id值大于1,即结果为[2,3,4,5,6,7,8,9,10,11]; // offset(2)表示往后偏移2个,结果为[4,5,6,7,8,9,10,11,12,13]; Query query = qb.where(StudentDao.Properties.Id.gt(1)).limit(10).offset(2).build(); List list = query.list(); //通过SetParameter来修改上面的查询条件,比如我们将上面条件修改取10条Id值大于5,往后偏移两位的数据,方法如下! query.setParameter(0,5); List list1 = query.list(); return list1; } 在多个线程中使用QueryBuilder
如果在多个线程中使用查询,则必须调用 forCurrentThread ()以获取当前线程的Query实例。Query的对象实例绑定到构建查询的拥有线程。
这使您可以安全地在Query对象上设置参数,而其他线程不会干扰。如果其他线程尝试在查询上设置参数或执行绑定到另一个线程的查询,则会抛出异常。像这样,您不需要同步语句。实际上,您应该避免锁定,因为如果并发事务使用相同的Query对象,这可能会导致死锁。 每次调用forCurrentThread ()时, 参数都会在使用其构建器构建查询时设置为初始参数。使用QueryBuilder进行批量删除操作
使用QueryBuilder进行批量删除操作,不会删除单个实体,但会删除符合某些条件的所有实体。要执行批量删除,请创建QueryBuilder,调用其 buildDelete ()方法,然后执行返回的 DeleteQuery。
例子:删除数据库中id大于5的所有其他数据
public boolean deleteItem(){ DaoSession daoSession = ((AserbaoApplication) getApplication()).getDaoSession(); QueryBuilder where = daoSession.queryBuilder(Student.class).where(StudentDao.Properties.Id.gt(5)); DeleteQuery deleteQuery = where.buildDelete(); deleteQuery.executeDeleteWithoutDetachingEntities(); return false; } 注解讲解
从GreenDao 3 使用注解来定义模型和实体,前面也讲过,通过注解的使用可以快速构建数据库表,包括设置主键,自增,值是否唯一等等等……
下面我们来看下注解的简单使用:
@Entitypublic class Student { @Id(autoincrement = true) Long id; @Unique int studentNo;//学号 int age; //年龄 String telPhone;//手机号 String sex; //性别 String name;//姓名 String address;//家庭住址 String schoolName;//学校名字 String grade;//几年级 ……getter and setter and constructor method…… } @Entity注解
@Entity是GreenDao必不可少的注解,只有在实体类中使用了@Entity注解GreenDao才会创建对应的表。当然我们也可以使用@Entity配置一些细节:
- schema:如果你有多个架构,你可以告诉GreenDao当前属于哪个架构。
- active:标记一个实体处于活跃状态,活动实体有更新、删除和刷新方法。
- nameInDb:在数据中使用的别名,默认使用的是实体的类名。
- indexes:标记如果DAO应该创建数据库表(默认为true),如果您有多个实体映射到一个表,或者表的创建是在greenDAO之外进行的,那么将其设置为false。
- createInDb:标记创建数据库表。
- generateGettersSetters:如果缺少,是否应生成属性的getter和setter方法。
@Entity( schema = "myschema", active = true, nameInDb = "AWESOME_USERS", indexes = { @Index(value = "message DESC", unique = true) }, createInDb = false, generateConstructors = true, generateGettersSetters = true)public class Student{ ……} 基础属性注解(@Id,@Property,@NotNull,@Transient)
@Id
@Id注解选择 long / Long属性作为实体ID。在数据库方面,它是主键。参数autoincrement = true 表示自增,id不给赋值或者为赋值为null即可(这里需要注意,如果要实现自增,id必须是Long,为long不行!)。
@Entity public class Student { @Id(autoincrement = true) Long id; …… }@Property
允许您定义属性映射到的非默认列名。如果不存在,GreenDAO将以SQL-ish方式使用字段名称(大写,下划线而不是camel情况,例如 name将成为 NAME)。注意:您当前只能使用内联常量来指定列名。
@Entitypublic class Student { @Id(autoincrement = true) Long id; @Property (nameInDb="name") //设置了,数据库中的表格属性名为"name",如果不设置,数据库中表格属性名为"NAME" String name; ……} @NotNull :设置数据库表当前列不能为空 。
@Transient :添加次标记之后不会生成数据库表的列。标记要从持久性中排除的属性。将它们用于临时状态等。或者,您也可以使用Java中的transient关键字。
索引注解
@Index:使用@Index作为一个属性来创建一个索引,通过name设置索引别名,也可以通过unique给索引添加约束。
@Unique:向索引添加UNIQUE约束,强制所有值都是唯一的。
@Entitypublic class Student { @Id(autoincrement = true) Long id; @Property(nameInDb="name") @Index(unique = true) String name; ……} 注意: 上面这种情况,约定name为唯一值,向数据库中通过insert方法继续添加已存在的name数据,会抛异常:
10-08 20:59:46.274 31939-31939/com.example.aserbao.aserbaosandroid E/AndroidRuntime: FATAL EXCEPTION: main Process: com.example.aserbao.aserbaosandroid, PID: 31939 android.database.sqlite.SQLiteConstraintException: UNIQUE constraint failed: STUDENT.name (Sqlite code 2067), (OS error - 2:No such file or directory) ……
若使用insertOrReplace()方法添加数据,当前数据库中不会有重复的数据,但是重复的这条数据的id会被修改!若项目中有用到id字段进行排序的话,这一点需要特别注意。
关系注解
关系型注解GreenDao中主要就两个:
- @ToOne:定义与另一个实体(一个实体对象)的关系
- @ToMany:定义与多个实体对象的关系 至于如何使用,我们马上就讲。
一对一,一对多,多对多关系表的创建
平常项目中,我们经常会使用到多表关联,如文章开头所说的数据库表结构设置的那样!接下来我们来讲如何通过GreenDao实现多表关联。
一对一
一个学生对应一个身份证号:
做法:
- 我们在Student中设置一个注解@ToOne(joinProperty = “name”)
- 在创建Student的时候,将对应的数据传递给IdCard;
代码部分:
学生Student代码:
@Entitypublic class Student { @Id(autoincrement = true) Long id; @Unique int studentNo;//学号 int age; //年龄 String telPhone;//手机号 String sex; //性别 String name;//姓名 String address;//家庭住址 String schoolName;//学校名字 String grade;//几年级 @ToOne(joinProperty = "name") IdCard student; ……getter and setter ……} 身份证IdCard代码:
@Entitypublic class IdCard { @Id String userName;//用户名 @Unique String idNo;//身份证号 ……getter and setter ……} insert一组数据:
public void addStudent(){ DaoSession daoSession = ((AserbaoApplication) getApplication()).getDaoSession(); Student student = new Student(); student.setStudentNo(i); int age = mRandom.nextInt(10) + 10; student.setAge(age); student.setTelPhone(RandomValue.getTel()); String chineseName = RandomValue.getChineseName(); student.setName(chineseName); if (i % 2 == 0) { student.setSex("男"); } else { student.setSex("女"); } student.setAddress(RandomValue.getRoad()); student.setGrade(String.valueOf(age % 10) + "年纪"); student.setSchoolName(RandomValue.getSchoolName()); daoSession.insert(student); //插入对应的IdCard数据 IdCard idCard = new IdCard(); idCard.setUserName(userName); idCard.setIdNo(RandomValue.getRandomID()); daoSession.insert(idCard); } ok,数据可以了!现在数据库表插入完成了。
一对多
一个人拥有多个信用卡
做法:
- 在我们在Student中设置@ToMany(referencedJoinProperty = “studentId”);
- 我们在CreditCard中设置编写对应的id主键;
Student的代码:
@Entitypublic class Student { @Id(autoincrement = true) Long id; @Unique int studentNo;//学号 int age; //年龄 String telPhone;//手机号 String sex; //性别 String name;//姓名 String address;//家庭住址 String schoolName;//学校名字 String grade;//几年级 @ToMany(referencedJoinProperty = "studentId) // 这个studentId是对应在CreditCard中的studentId List creditCardsList; ……getter and setter …… } CreditCard的代码:
@Entitypublic class CreditCard { @Id Long id; Long studentId; Long teacherId; String userName;//持有者名字 String cardNum;//卡号 String whichBank;//哪个银行的 int cardType;//卡等级,分类 0 ~ 5 ……getter and setter …… } 添加数据代码:
public void addStudent(){ DaoSession daoSession = ((AserbaoApplication) getApplication()).getDaoSession(); Student student = new Student(); student.setStudentNo(i); int age = mRandom.nextInt(10) + 10; student.setAge(age); student.setTelPhone(RandomValue.getTel()); String chineseName = RandomValue.getChineseName(); student.setName(chineseName); if (i % 2 == 0) { student.setSex("男"); } else { student.setSex("女"); } student.setAddress(RandomValue.getRoad()); student.setGrade(String.valueOf(age % 10) + "年纪"); student.setSchoolName(RandomValue.getSchoolName()); daoSession.insert(student); //插入对应的CreditCard数据 for (int j = 0; j < random.nextInt(5) + 1 ; j++) { CreditCard creditCard = new CreditCard(); creditCard.setUserId(id); creditCard.setUserName(userName); creditCard.setCardNum(String.valueOf(random.nextInt(899999999) + 100000000) + String.valueOf(random.nextInt(899999999) + 100000000)); creditCard.setWhichBank(RandomValue.getBankName()); creditCard.setCardType(random.nextInt(10)); daoSession.insert(creditCard); }} 多对多
一个学生有多个老师,老师有多个学生。
做法:
我们需要创建一个学生老师管理器(StudentAndTeacherBean),用来对应学生和老师的ID;
我们需要在学生对象中,添加注解:
@ToMany@JoinEntity(entity = StudentAndTeacherBean.class,sourceProperty = "studentId",targetProperty = "teacherId")ListteacherList;
我们需要在老师对象中,添加注解:@ToMany
@JoinEntity(entity = StudentAndTeacherBean.class,sourceProperty = "teacherId",targetProperty = "studentId") ListstudentList;
StudentAndTeacherBean代码:
@Entitypublic class StudentAndTeacherBean { @Id(autoincrement = true) Long id; Long studentId;//学生ID Long teacherId;//老师ID ……getter and setter ……} Student 代码:
@Entitypublic class Student { @Id(autoincrement = true) Long id; @Unique int studentNo;//学号 int age; //年龄 String telPhone;//手机号 String sex; //性别 String name;//姓名 String address;//家庭住址 String schoolName;//学校名字 String grade;//几年级 @ToMany @JoinEntity(entity = StudentAndTeacherBean.class,sourceProperty = "studentId",targetProperty = "teacherId") List teacherList; ……getter and setter …… } Teacher代码:
@Entitypublic class Teacher { @Id(autoincrement = true) Long id; @Unique int teacherNo;//职工号 int age; //年龄 String sex; //性别 String telPhone; String name;//姓名 String schoolName;//学校名字 String subject;//科目 @ToMany @JoinEntity(entity = StudentAndTeacherBean.class,sourceProperty = "teacherId",targetProperty = "studentId") List studentList; ……getter and setter ……} 数据添加:
public void addData(){ Student student = new Student(); student.setStudentNo(i); int age = mRandom.nextInt(10) + 10; student.setAge(age); student.setTelPhone(RandomValue.getTel()); String chineseName = RandomValue.getChineseName(); student.setName(chineseName); if (i % 2 == 0) { student.setSex("男"); } else { student.setSex("女"); } student.setAddress(RandomValue.getRoad()); student.setGrade(String.valueOf(age % 10) + "年纪"); student.setSchoolName(RandomValue.getSchoolName()); daoSession.insert(student); Collections.shuffle(teacherList); for (int j = 0; j < mRandom.nextInt(8) + 1; j++) { if(j < teacherList.size()){ Teacher teacher = teacherList.get(j); StudentAndTeacherBean teacherBean = new StudentAndTeacherBean(student.getId(), teacher.getId()); daoSession.insert(teacherBean); } }} 好了,成功;
数据库的升级
GreenDao的OpenHelper下有个 onUpgrade(Database db, int oldVersion, int newVersion)方法,当设置的数据库版本改变时,在数据库初始化的时候就会回调到这个方法,我们可以通过继承OpenHelper重写onUpgrade方法来实现数据库更新操作:
GreenDao的升级思路:
- 创建临时表TMP_,复制原来的数据库到临时表中;
- 删除之前的原表;
- 创建新表;
- 将临时表中的数据复制到新表中,最后将TMP_表删除掉;
ok,思路就是这样, 总共两个类: 一个MyDaoMaster(OpenHelper继承类),一个MigrationHelper(数据库操作类) 下面是代码编写:
修改Application中的DaoMaster的创建:
MyDaoMaster helper = new MyDaoMaster(this, "aserbaos.db");// DaoMaster.DevOpenHelper helper = new DaoMaster.DevOpenHelper(this, "aserbao.db"); SQLiteDatabase db = helper.getWritableDatabase(); DaoMaster daoMaster = new DaoMaster(db); daoSession = daoMaster.newSession();
MyDaoMaster代码:
public class MyDaoMaster extends OpenHelper { private static final String TAG = "MyDaoMaster"; public MyDaoMaster(Context context, String name) { super(context, name); } public MyDaoMaster(Context context, String name, SQLiteDatabase.CursorFactory factory) { super(context, name, factory); } @Override public void onUpgrade(Database db, int oldVersion, int newVersion) { super.onUpgrade(db, oldVersion, newVersion); MigrationHelper.migrate(db, new MigrationHelper.ReCreateAllTableListener() { @Override public void onCreateAllTables(Database db, boolean ifNotExists) { DaoMaster.createAllTables(db, ifNotExists); } @Override public void onDropAllTables(Database db, boolean ifExists) { DaoMaster.dropAllTables(db, ifExists); } },ThingDao.class); Log.e(TAG, "onUpgrade: " + oldVersion + " newVersion = " + newVersion); }} MigrationHelper 代码:
public final class MigrationHelper { public static boolean DEBUG = false; private static String TAG = "MigrationHelper"; private static final String SQLITE_MASTER = "sqlite_master"; private static final String SQLITE_TEMP_MASTER = "sqlite_temp_master"; private static WeakReference weakListener; public interface ReCreateAllTableListener{ void onCreateAllTables(Database db, boolean ifNotExists); void onDropAllTables(Database db, boolean ifExists); } public static void migrate(SQLiteDatabase db, Class >... daoClasses) { printLog("【The Old Database Version】" + db.getVersion()); Database database = new StandardDatabase(db); migrate(database, daoClasses); } public static void migrate(SQLiteDatabase db, ReCreateAllTableListener listener, Class >... daoClasses) { weakListener = new WeakReference<>(listener); migrate(db, daoClasses); } public static void migrate(Database database, ReCreateAllTableListener listener, Class >... daoClasses) { weakListener = new WeakReference<>(listener); migrate(database, daoClasses); } public static void migrate(Database database, Class >... daoClasses) { printLog("【Generate temp table】start"); generateTempTables(database, daoClasses); printLog("【Generate temp table】complete"); ReCreateAllTableListener listener = null; if (weakListener != null) { listener = weakListener.get(); } if (listener != null) { listener.onDropAllTables(database, true); printLog("【Drop all table by listener】"); listener.onCreateAllTables(database, false); printLog("【Create all table by listener】"); } else { dropAllTables(database, true, daoClasses); createAllTables(database, false, daoClasses); } printLog("【Restore data】start"); restoreData(database, daoClasses); printLog("【Restore data】complete"); } private static void generateTempTables(Database db, Class >... daoClasses) { for (int i = 0; i < daoClasses.length; i++) { String tempTableName = null; DaoConfig daoConfig = new DaoConfig(db, daoClasses[i]); String tableName = daoConfig.tablename; if (!isTableExists(db, false, tableName)) { printLog("【New Table】" + tableName); continue; } try { tempTableName = daoConfig.tablename.concat("_TEMP"); StringBuilder dropTableStringBuilder = new StringBuilder(); dropTableStringBuilder.append("DROP TABLE IF EXISTS ").append(tempTableName).append(";"); db.execSQL(dropTableStringBuilder.toString()); StringBuilder insertTableStringBuilder = new StringBuilder(); insertTableStringBuilder.append("CREATE TEMPORARY TABLE ").append(tempTableName); insertTableStringBuilder.append(" AS SELECT * FROM ").append(tableName).append(";"); db.execSQL(insertTableStringBuilder.toString()); printLog("【Table】" + tableName +"\n ---Columns-->"+getColumnsStr(daoConfig)); printLog("【Generate temp table】" + tempTableName); } catch (SQLException e) { Log.e(TAG, "【Failed to generate temp table】" + tempTableName, e); } } } private static boolean isTableExists(Database db, boolean isTemp, String tableName) { if (db == null || TextUtils.isEmpty(tableName)) { return false; } String dbName = isTemp ? SQLITE_TEMP_MASTER : SQLITE_MASTER; String sql = "SELECT COUNT(*) FROM " + dbName + " WHERE type = ? AND name = ?"; Cursor cursor=null; int count = 0; try { cursor = db.rawQuery(sql, new String[]{ "table", tableName}); if (cursor == null || !cursor.moveToFirst()) { return false; } count = cursor.getInt(0); } catch (Exception e) { e.printStackTrace(); } finally { if (cursor != null) cursor.close(); } return count > 0; } private static String getColumnsStr(DaoConfig daoConfig) { if (daoConfig == null) { return "no columns"; } StringBuilder builder = new StringBuilder(); for (int i = 0; i < daoConfig.allColumns.length; i++) { builder.append(daoConfig.allColumns[i]); builder.append(","); } if (builder.length() > 0) { builder.deleteCharAt(builder.length() - 1); } return builder.toString(); } private static void dropAllTables(Database db, boolean ifExists, @NonNull Class >... daoClasses) { reflectMethod(db, "dropTable", ifExists, daoClasses); printLog("【Drop all table by reflect】"); } private static void createAllTables(Database db, boolean ifNotExists, @NonNull Class >... daoClasses) { reflectMethod(db, "createTable", ifNotExists, daoClasses); printLog("【Create all table by reflect】"); } /** * dao class already define the sql exec method, so just invoke it */ private static void reflectMethod(Database db, String methodName, boolean isExists, @NonNull Class >... daoClasses) { if (daoClasses.length < 1) { return; } try { for (Class cls : daoClasses) { Method method = cls.getDeclaredMethod(methodName, Database.class, boolean.class); method.invoke(null, db, isExists); } } catch (NoSuchMethodException e) { e.printStackTrace(); } catch (InvocationTargetException e) { e.printStackTrace(); } catch (IllegalAccessException e) { e.printStackTrace(); } } private static void restoreData(Database db, Class >... daoClasses) { for (int i = 0; i < daoClasses.length; i++) { DaoConfig daoConfig = new DaoConfig(db, daoClasses[i]); String tableName = daoConfig.tablename; String tempTableName = daoConfig.tablename.concat("_TEMP"); if (!isTableExists(db, true, tempTableName)) { continue; } try { // get all columns from tempTable, take careful to use the columns list List newTableInfos = TableInfo.getTableInfo(db, tableName); List tempTableInfos = TableInfo.getTableInfo(db, tempTableName); ArrayList selectColumns = new ArrayList<>(newTableInfos.size()); ArrayList intoColumns = new ArrayList<>(newTableInfos.size()); for (TableInfo tableInfo : tempTableInfos) { if (newTableInfos.contains(tableInfo)) { String column = '`' + tableInfo.name + '`'; intoColumns.add(column); selectColumns.add(column); } } // NOT NULL columns list for (TableInfo tableInfo : newTableInfos) { if (tableInfo.notnull && !tempTableInfos.contains(tableInfo)) { String column = '`' + tableInfo.name + '`'; intoColumns.add(column); String value; if (tableInfo.dfltValue != null) { value = "'" + tableInfo.dfltValue + "' AS "; } else { value = "'' AS "; } selectColumns.add(value + column); } } if (intoColumns.size() != 0) { StringBuilder insertTableStringBuilder = new StringBuilder(); insertTableStringBuilder.append("REPLACE INTO ").append(tableName).append(" ("); insertTableStringBuilder.append(TextUtils.join(",", intoColumns)); insertTableStringBuilder.append(") SELECT "); insertTableStringBuilder.append(TextUtils.join(",", selectColumns)); insertTableStringBuilder.append(" FROM ").append(tempTableName).append(";"); db.execSQL(insertTableStringBuilder.toString()); printLog("【Restore data】 to " + tableName); } StringBuilder dropTableStringBuilder = new StringBuilder(); dropTableStringBuilder.append("DROP TABLE ").append(tempTableName); db.execSQL(dropTableStringBuilder.toString()); printLog("【Drop temp table】" + tempTableName); } catch (SQLException e) { Log.e(TAG, "【Failed to restore data from temp table 】" + tempTableName, e); } } } private static List getColumns(Database db, String tableName) { List columns = null; Cursor cursor = null; try { cursor = db.rawQuery("SELECT * FROM " + tableName + " limit 0", null); if (null != cursor && cursor.getColumnCount() > 0) { columns = Arrays.asList(cursor.getColumnNames()); } } catch (Exception e) { e.printStackTrace(); } finally { if (cursor != null) cursor.close(); if (null == columns) columns = new ArrayList<>(); } return columns; } private static void printLog(String info){ if(DEBUG){ Log.d(TAG, info); } } private static class TableInfo { int cid; String name; String type; boolean notnull; String dfltValue; boolean pk; @Override public boolean equals(Object o) { return this == o || o != null && getClass() == o.getClass() && name.equals(((TableInfo) o).name); } @Override public String toString() { return "TableInfo{" + "cid=" + cid + ", name='" + name + '\'' + ", type='" + type + '\'' + ", notnull=" + notnull + ", dfltValue='" + dfltValue + '\'' + ", pk=" + pk + '}'; } private static List getTableInfo(Database db, String tableName) { String sql = "PRAGMA table_info(" + tableName + ")"; printLog(sql); Cursor cursor = db.rawQuery(sql, null); if (cursor == null) return new ArrayList<>(); TableInfo tableInfo; List tableInfos = new ArrayList<>(); while (cursor.moveToNext()) { tableInfo = new TableInfo(); tableInfo.cid = cursor.getInt(0); tableInfo.name = cursor.getString(1); tableInfo.type = cursor.getString(2); tableInfo.notnull = cursor.getInt(3) == 1; tableInfo.dfltValue = cursor.getString(4); tableInfo.pk = cursor.getInt(5) == 1; tableInfos.add(tableInfo); // printLog(tableName + ":" + tableInfo); } cursor.close(); return tableInfos; } }} GreenDao数据库加密
开发中对于存储于数据库中的敏感数据,我们可以通过对数据库加密来进行保护。GreenDao可以通过SQLCipher来进行加密处理。下面我们简单讲解下加密过程:
步骤:
- 导入加密库文件:
implementation 'net.zetetic:android-database-sqlcipher:3.5.6'
- 修改DaoSession的生成方式:
// MyDaoMaster helper = new MyDaoMaster(this, "aserbaos.db"); //数据库升级写法 DaoMaster.DevOpenHelper helper = new DaoMaster.DevOpenHelper(this, "aserbao.db"); //SQLiteDatabase db = helper.getWritableDatabase(); //不加密的写法 Database db = helper.getEncryptedWritableDb("aserbao"); //数据库加密密码为“aserbao"的写法 DaoMaster daoMaster = new DaoMaster(db); daoSession = daoMaster.newSession();
项目地址
当前文章所有代码在AserbaosAndroid/app/src/main/java/com/aserbao/aserbaosandroid/functions/database/greenDao/relation目录下;
参考博客
修改记录
-
CreditCard中不能只使用一个useId来做关联,因为我这里Teacher和Student都和CreditCard是一对多关系,所以我们需要建两个对应关系字段。为了分辨添加了studentId和teacherId。
@Entitypublic class CreditCard { @Id Long id; Long studentId; Long teacherId; String userName;//持有者名字 String cardNum;//卡号 String whichBank;//哪个银行的 int cardType;//卡等级,分类 0 ~ 5} -
Student中的@ToMany(referencedJoinProperty =“id”)这个id对应的是CreditCard中的studentId,不是自增Id。(问题由@山豆几_提出,感谢)
修改后的代码应该是:
@ToMany(referencedJoinProperty = "studentId") List
creditCardsList;
扩展
greendao官方已经做的很不错了,但是针对项目开发我们还要写很多东西,项目开发注重的是模块化和组件化,因此这里有另外一篇专门针对greendao处理业务做了一个封装,可以作为参考,我自己的项目则是额外在此基础上又封了一层,业务和API之间做到完全隔离,前边说到greendao已经不再维护了,官方将重心移到了ObjectBox上,我这样做也是方便后期更容易的更替。